Directx 11 with rastertek
Tutorial 4: Buffers, Shaders, and HLSL 연습문제
코다람쥐
2022. 9. 3. 20:06
To Do Exercises
1. Compile and run the tutorial. Ensure it draws a green triangle to the screen. Press escape to quit once it does.
2. Change the color of the triangle to red.
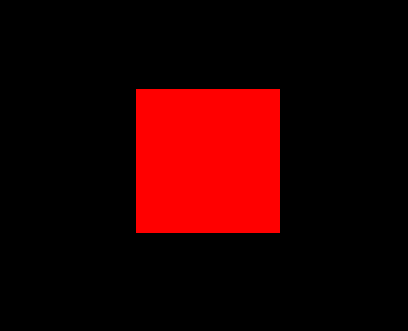
3. Change the triangle to a square.
4. Move the camera back 10 more units.
5. Change the pixel shader to output the color half as bright. (huge hint: multiply something in ColorPixelShader by 0.5f)
1. 튜토리얼을 컴파일하고 실행해 보십시오. 화면에 초록색 삼각형이 그려지는 것을 확인하십시오. 잘 그려진다면 Esc키를 눌러 종료하십시오.

2. 삼각형의 색깔을 빨간색으로 바꿔 보십시오.
modelclass.cpp
bool ModelClass::InitializeBuffers(ID3D11Device* device)
{
............... 생략..............
	// Load the vertex array with data.
	vertices[0].position = D3DXVECTOR3(-1.0f, -1.0f, 0.0f);  // Bottom left.
	vertices[0].color = D3DXVECTOR4(1.0f, 0.0f, 0.0f, 1.0f);

	vertices[1].position = D3DXVECTOR3(0.0f, 1.0f, 0.0f);  // Top middle.
	vertices[1].color = D3DXVECTOR4(1.0f, 0.0f, 0.0f, 1.0f);

	vertices[2].position = D3DXVECTOR3(1.0f, -1.0f, 0.0f);  // Bottom right.
	vertices[2].color = D3DXVECTOR4(1.0f, 0.0f, 0.0f, 1.0f);
    ............... 생략..............
}
3. 삼각형 대신 사각형이 그려지도록 해 보십시오.
modelclass.cpp
bool ModelClass::InitializeBuffers(ID3D11Device* device)
{
....................생략.....................
	// Set the number of vertices in the vertex array.
	m_vertexCount = 4;

	// Set the number of indices in the index array.
	m_indexCount = 6;

	// Create the vertex array.
	vertices = new VertexType[m_vertexCount];
	if (!vertices)
	{
		return false;
	}

	// Create the index array.
	indices = new unsigned long[m_indexCount];
	if (!indices)
	{
		return false;
	}

	// Load the vertex array with data.
	vertices[0].position = D3DXVECTOR3(-1.0f, -1.0f, 0.0f);  // Bottom left.
	vertices[0].color = D3DXVECTOR4(1.0f, 0.0f, 0.0f, 1.0f);

	vertices[1].position = D3DXVECTOR3(-1.0f, 1.0f, 0.0f);  // Top left.
	vertices[1].color = D3DXVECTOR4(1.0f, 0.0f, 0.0f, 1.0f);

	vertices[2].position = D3DXVECTOR3(1.0f, -1.0f, 0.0f);  // Bottom right.
	vertices[2].color = D3DXVECTOR4(1.0f, 0.0f, 0.0f, 1.0f);

	vertices[3].position = D3DXVECTOR3(1.0f, 1.0f, 0.0f);  // Top right.
	vertices[3].color = D3DXVECTOR4(1.0f, 0.0f, 0.0f, 1.0f);

	// Load the index array with data.
	indices[0] = 0;  // Bottom right.
	indices[1] = 1;  // Bottom left.
	indices[2] = 2;  // Top left

	indices[3] = 2; // Bottom right.
	indices[4] = 1; // Top left.
	indices[5] = 3; // Top right.
    ....................생략.....................
    }
정점 배열의 수, 인덱스 배열의 수를 각각 4, 6으로 고치고 vertices[3]요소를 새롭게 정의해주었다.
그리고 사각형을 그리기 위해서 0~5번 인덱스를 정점 배열에 맞게 연결해주었다.( 시계방향으로 해야함. )
4. 카메라를 10단위만큼 뒤로 물러나게 해 보십시오.
graphicsclass.cpp
bool GraphicsClass::Initialize(int screenWidth, int screenHeight, HWND hwnd)
{
..........생략.............
	// Set the initial position of the camera.
	m_Camera->SetPosition(0.0f, 0.0f, -20.0f);
..........생략.............
}
5. 픽셀 셰이더를 수정하여 출력되는 밝기가 절반이 되도록 해 보십시오.
(힌트: ColorPixelShader의 무언가에 0.5f를 곱해 보세요.)
color.ps
float4 ColorPixelShader(PixelInputType input) : SV_TARGET
{
    return input.color * 0.5f;
}